Friday, September 27, 2013

Little Mermaid nails


It is getting to be my favorite nail time of the year but I’m starting to think I may not have enough time to do all the nails that I want to do. Between Halloween, fall, and Disney nails, I have a lot of plans and I’m simply running out of time (68 days till Disney!). Oh, so many plans, so little time. I guess I just need to paint my nails more J

I want to do different nails for all the Disney Princesses, so I figured I should start with my favorite. I have always loved The Little Mermaid; I had a huge poster of it on the back of my bedroom door when I was a little kid. For this manicure I used Orly Prelude to a Kiss, Liquid Vinyl, and White Tips, China Glaze Gothic Lolita, Turned Up Turquoise, and Mahogany Magic, and Sally Hansen CSM All Fired Up and Mermaid’s Tale. I didn’t realize how many colors I used until I just wrote them all out, wow.
Little Mermaid nails

I found some loose glitter pieces that worked perfect as a mermaid tail on my pinky, they were super annoying to have on though, my hair got all caught up in it while I was washing my hair, not a pleasant experience. I wasn’t really sure what I wanted to do for all my nails and after I did the shell bra it occurred to me that it was a little weird that I focused on Ariel’s chest, I’m sure she will forgive me.
I’m not even sure how I bent my thumb like that

My favorite nail is the Ariel on my thumb, I think she turned out really cute and it makes me want to do a nail like that for all the princesses. I’m going to have to come up with other things to add to them to make them all look different; otherwise all the blondes will look pretty similar.

Not only is today 68 days till Disney, it’s also my 5th anniversary. I’m super lucky to be married to Thad, he is an awesome husband, and I’m pretty sure I could be married to him forever J Happy anniversary honey!

Wednesday, September 25, 2013

OPI - Pompeii Purple nails


Every once and a while you stumble on a nail color that from the first time you wear it, you know it will be one of your favorites forever. When I was a kid we had a L’Oreal color that was called Sea Violet, I still remember that color because I loved it so much. We much have bought ten bottles of that color, if I ever saw it in the store I would buy it in a heartbeat. While spending one of my super sweet Ulta gift cards I bought OPI Pompeii Purple and I fell in love. It is such an amazing color, I’m pretty sure I love everything about it. I’m also pretty sure that this whole post is going to be an ode to Pompeii Purple.

I kept these nails on for almost a full week, pause for shock and awe, almost a whole week. For this manicure I used OPI Pompeii Purple and Sally Hansen CSM Gilty Pleasure. I had no idea what kind of art I wanted to do until I had already started painting. As soon as I saw how amazing the OPI is I knew that I didn’t want to cover much of it up with a design so I ended up doing my first chevron!
Pompeii Purple nails

Can we take a minute and talk about how amazing this color is? I didn’t realize how popular this color is until I had these nails at work and two different ladies guessed the name of the color correctly. It doesn’t happen very often that someone knows the name of the color that I’m wearing, I’m going to go out on a limb and say that I’m far from the first person to discover how amazing this color is.
Pictures can’t do this color justice

My chevrons are a bit of a miss. I didn’t center my guide dots very well so the whole design is very much off center. I also didn’t have my brushes so I did the design with a dotting tool so the lines aren’t super smooth (yes I’m blaming the tool and not the painter).
Lumpy chevrons

If you like pink/purple nail polish I highly recommend this color, it looks so awesome on that I was tempted to paint them this color again after I took these nails off. Now, if only I could find Sea Violet.

Monday, September 23, 2013

Tuxedo nail step by step


Netflix is evil. They recently changed how they play TV shows so that the next one starts 20 seconds after the last one ended. I have watched a shameful amount of How I Met Your Mother over the last few weeks but there are so many freakin episodes that I’m pretty sure I’m going to be watching this show for the next few months. Oh how TV helps me to be so lazy.

I had a first today! I was asked to do a step by step for my tuxedo nails that I did in June (as part of my wedding nails). I’ve never done a step by step before, but I hope this helps you to recreate my tuxedo nails. For this manicure I used Orly White Tips and Liquid Vinyl, Sally Hansen CSM Wine Not, and China Glaze Rich & Famous. A few disclaimers about my step by step: 1. I didn’t actually want to have tuxedo nails so I only painted two nails 2. I’m a really messy painter so please disregard all the paint that appears to not be on my nails and 3. I don’t actually have a third disclaimer, but it felt like I couldn’t just have two.
I start these nails like I start all nails, with a coat of OPI Nail Envy and SV base coat. On top of that I did two coats of Orly.
To start my tuxedos I painted a V with a black striper and then filled in the bottom of my nail with the Orly brush. To get in the ‘tight’ places I used a dotting tool. Try to get the V as centered on your nail as possible; I didn’t do so well on that front.
Ok, it looks like I did a lot in this step, but I really didn’t. To create the bow tie I did one smallish center dot and then used a dotting tool to create two small triangles off of it. I then put buttons on my tux and the dots on my black nail (I think they sorta look like buttons too). I put one larger white dot on the black tux so I could create the boutonniere.
To make the boutonniere I put a pink dot on top of the white dot and then took my wine color and made small c shapes in the pink with it. It’s ok when you are doing this if the pink swirls with the other color a little, it just makes it look more like a rose.

That’s how I did these nails! If you don’t have a striper you can use any small brush dipped in polish. If you don’t have a dotting tool that’s ok too, you can use the pointed end of a toothpick for the small stuff (like the detail on the flower) or cut the toothpick in half and file it smooth to use for a larger dot (like for the bow tie or buttons). For even larger dots you can use the end of a quilting pin, although you may want to put the pointy end in an eraser or something so you don’t injure yourself.

Hope this step by step was helpful, if you do these nails I would love to know how they turned out, be sure to let me know in the comments J

Friday, September 13, 2013

OPI - I Saw...U Saw...We Saw...Warsaw nails


I went to an awesome bachelorette party last weekend. We drove up north and she had her party on a pontoon boat on a big, beautiful lake. I hadn’t been on a boat all summer and it was just the perfect way to end the season. I was also super proud of myself that I didn’t let myself burn at all, that is a pretty big win when you are pale and you spend a whole day on a boat. I think that last weekend was the official end to my string of weekend plans; I have nothing that I have to go to this weekend, which sounds pretty good.

I really liked these nails even though they were a pain. For some reason I think that blue nail polish is the hardest to work with. It was super difficult to get all the blue off from around my nails and when I took the polish off my fingers were stained blue. For this manicure I used OPI I Saw…U Saw…We Saw…Warsaw, Sally Hansen CSM Gilty Pleasure, Sally Girl Matte Top Coat, and Orly Liquid Vinyl.  
 
OPI - I Saw…U Saw…We Saw…Warsaw nails

This is my first true navy and I really like how it looks, I especially like it as a matte, but I’m a sucker for matte so that is expected. I love using new polish, I got this one (and three others) with birthday gift cards at Ulta. I still have more birthday Ulta money and now I also have a coupon, I’m pretty sure this weekend is going to include staring at nail polish (shocking).
Please disregard the ugly hangnail

The formula for the blue was consistent with other OPI polish; I’m wearing two coats and had full coverage. Unfortunately I decided I needed to finish off my last pitcher of beer-garitas by myself before starting this manicure so I had quite a bit of clean up afterwards. The blue just didn’t want to leave my fingers once it made contact, I really feel like blue is the worst for that.
I should do animal print more often

When someone at work saw these they asked if they were moons and stars, now I really want to use this blue as a base for cute moons and stars. My post it list isn’t getting any shorter, there are just so many fun things you can paint on your nails!

Wednesday, September 11, 2013

China Glaze - Whirled Away nails


I get way too excited about some things, like way too excited. I would like to think this trait could be considered cute and not crazy, but I guess that is up to interpretation. I generally get excited about really small things; based on this start I bet you can guess I got excited about something small recently. I got an invitation to be part of the Nielson TV group and I’m way too excited. They sent me a postcard last week that said the survey would arrive shortly; I actually checked the mail with unbridled enthusiasm each day until the survey packet came. I thought this meant that I was in like Flyn, but apparently getting into the Nielson TV family takes more work than that. I have to fill out the survey and send it in and then they decide if I’m going to be accepted into the group. Oh! This additional anticipation is going to kill me! Want to know the best part? They paid me $2 for doing the survey! What?!?! This thing that I’ve been ridiculously excited about for days is also going to provide me crisp $1 bills? What an amazing week it has been, now fingers crossed I get in.

I’m not as excited about these nails as I am about the survey I got. Don’t get me wrong, there are some aspects of the manicure that I really like, but the overall errors are just too big for me to happily gaze upon these nails. For this manicure I used Sally Hansen CSM Butterscotch and China Glaze Whirled Away. The China Glaze is like nothing I have ever owned before, to me it looks like white and black confetti floating in a clear coat, if it was shiny at all I would call it glitter.
China Glaze – Whirled Away nails

The polish is super cool and I love the overall look of it, I just had some trouble applying it which caused a million air bubbles to straight run these nails. Lesson learned, when applying this polish use thin coats and just do a bunch of them until you get the coverage you want, if you put on thick coats in order to put all the pieces you want on your nails, you are going to end up with a crap ton of ugly bubbles.
There are so many bubbles they almost look like they were on purpose

I think these nails look like modern art and from far away I loved how they looked. I have to give this polish another try and do thin coats to see if it behaves better. These nails also make me want to do more black designs on that putrid yellow color too, for some reason I like how it looks with black.

Monday, September 9, 2013

Grumpy Cat nails


I’m sorry for the long wait to see my birthday nails, but I hope they are worth the wait J. I was thinking for a long time about what nails I wanted to do to commemorate my 30th birthday and it wasn’t until a few days before the big day that I finally settled on the design. My fellow nail lover friend Patty is the one who suggested I do Grumpy Cat nails, and I can’t think of better nails to have when turning 30.

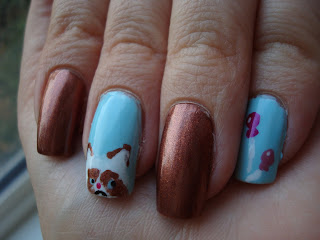
I surprised myself with how little flash these nails had but I ended up liking the solid brown next to the designed nails. For this manicure I used Sally Hansen CSM Barracuda, OPI Brisbane Bronze, Aphrodite’s Pink Nightie, and Pompeii Purple, and Orly Liquid Vinyl and White Tips.
Grumpy Cat nails

To create the adorable yet grumpy kitty on my middle finger I used a corner piece of makeup sponge and sponged on the white first. The triangular shape of the sponge helped define her ears. I did two layers of the white before I sponged on the brown; I always forget how much I love this brown!
Nothing says turning 30 like a disgruntled kitty on your middle finger

To get her tiny angry mouth I used my smallest dotting tool and used a stippling method to tap the color on. My original idea was to put a party hat on her but she took so long to do that I didn’t want to risk messing her up. To make it a little more birthday themed I put balloons on my thumb and pinkie. My right hand has balloons on the pinkie, middle, and thumb.
 
I can’t believe I missed her at the state fair

I had this manicure when I went to get a facial after my birthday and I got asked one of my favorite nail questions by the salon lady. She asked if I paint them before I put them on, I’m sure a loser that I love being able to say ‘no, actually they are real’. I hope my birthday nails were worth the wait and that you love Grumpy Cat as much as I do J

Tuesday, September 3, 2013

Blue Gradient nails


It’s my birthday! But these are not my birthday nails, I know it’s confusing. I write blogs ahead of time and at the time of writing this I haven’t actually even painted my birthday nails, it’s a crazy world we live in and I hope this revelation doesn’t make your mind explode. These are actually the nails I had for my friend’s baby shower, she is having a boy so I figured that blue nails were appropriate. I get so nervous at baby showers, everyone was super nice but I feel like I’m wearing a giant neon sign that says “I don’t like children”. Babies can sense fear, this is a well established fact, and there are always babies at baby showers, they just glare at me with a knowing look. Well, at least my nails looked cute.

This manicure slightly redeemed the sponging disaster that was my last sponging attempt. For this manicure I used Sally Hansen CSM Barracuda, Orly Skinny Dip, and China Glaze Splish Splash. I did a base of the lightest blue (Barracuda) and then sponged the two darker blues on top of that.
Blue Gradient nails

I’m not sure what the mysterious black dots on my index finger are from, if I were forced to guess I would say it is probably mascara. I guess that’s how I roll. I really liked how these turned out, doing a base coat of the lightest color worked out really well, it made the other blues stand out and made it so I had more overall nail coverage than I usually do with gradients.
In case you were wondering this is my favorite hoodie

I’m kinda surprised with how well the pictures turned out, while I was taking them I thought they would be too shiny and not show the color change but I guess camera magic helped me out.
It’s a boy!

These nails ended up being great for the baby shower, much better than the last ones. Congrats on your future baby boy Gayle J

Monday, September 2, 2013

Party nails


My birthday is tomorrow!! I have already had such a fun weekend and my birthday hasn’t even happened yet J On Saturday I had a birthday party, this was only the second birthday party I have ever had, so needless to say I was pretty excited about it. Thad decorated our yard and it looked so cute, he also got me a taco bar and it was amazing. We have a bunch of tacos and beer leftover from the party but I’m pretty sure those are the best leftovers ever. Thank you to everyone who put up with my drunk ass at my dirty thirty J

These were my party nails (not to be confused with my birthday nails which I’m painting later tonight). I loved the design I had with my striper overload nails so much I decided to recreate it with different colors. For this manicure I used Ulta Oh!, Sally Girl Matte Top Coat, and a ton of stripers.
Party nails!

I can’t even begin to say how much I love the matte top coat on the orange, it looks so frosted and smooth in person, I just love it. I think these nails look like feathers even more so than the first time I did the design, I can’t decide which ones I like more but I do know that I really dig these nails.
These nails say “I came to consume tacos and beer”

My co workers spoiled me for two straight weeks with birthday surprises and the matte top coat was one of them (who nice are they?). I got to say, I actually like the Sally Girl matte top coat over essie, crazy right? My essie is super thick and leaves white dots on everything but this top coat went on really smooth and didn’t leave any streak lines like the essie does. It takes longer for the matte finish to happen but overall I really liked the polish.
 
Love these nails

I was so happy with how these nails turned out and they worked great for a taco themed party J. I’m going to have to go through all my stripers and see what other color combos I can come up with, this design is just too much fun to only do twice J