Showing posts with label White Tips. Show all posts

Tuesday, November 26, 2013

Day of the Dead nails


I’m so ashamed that I’m posting my Halloween day nails almost a month after I painted them, I’m hoping that all of my dedicated readers will forgive me, I am lazy after all. We are going on vacation soon and I feel like I’m being swallowed by my endless lists of things I need to get done. We planned this trip about 10 months ago so you would think that I would have had all sorts of time to get everything done, but for some reason it feels like I crammed everything into the last few weeks. I still haven’t decided what nails I’m going to do for the trip, that’s how busy I’ve been!

But I digress; I hope these nails are worth the wait, they were pretty cool. For this manicure I used Orly Liquid Vinyl, Skinny Dip, and White Tips, China Glaze Pool Party and Turned Up Turquoise, Sally Hansen CSM All Fired Up, and Ulta Sun-Sational. These nails were more appropriate for the day after Halloween than for Halloween itself, but it was still fun to have little skulls on my nails for Halloween.
Day of the Dead nails

The best part of these nails was when I took pictures of them and my camera put boxes around each nail as if they were faces, the worst part of these nails was that it was like ten creepy little skulls were staring at me while I was trying to do things like type. It is a general rule of thumb that being a little creeped out by your nails isn’t a good thing.
Cute and Creepy

I truly hate painting my nails white, I don’t know what it is with me but the cuticles always look terrible when I use a white base color. It’s like I’m incapable of painting them correctly as soon as white is added to the equation. Or perhaps I always paint them wrong but the white is just more unforgiving than other colors. Either way, I’m staying away from white for a while.

Wednesday, October 30, 2013

Candy Corn nails


I hate scary movies, I hate being scare in general and try to avoid it at all costs (that’s why I like the little baby roller coasters at Disney). Thad on the other hand, loves to be scared. I decided to be nice the other day and agreed to watch a scary movie with him. He waited until it was totally dark outside and turned off all the lights so we could watch The Conjuring, holy freaking balls that movie is scary. For me, the scariest kind of movies are the ones that are based on a true story and/or demon possession, spoiler alert, this movie is terrifying. To make the whole movie watching experience even worse we were streaming the movie and it decided to freeze during a super scary scene so the TV was frozen and I screamed like a little girl.

Perhaps because I was subject to a scary part of Halloween I decided to do a manicure that is pretty much the opposite of scary.  For this manicure I used China Glaze Riveting, Orly White Tips, and Ulta Sun-Sational. I wasn’t a huge fan of these nails but I got so many compliments on them that I’ve started to like them more.
Candy Corn nails

I decided to sponge on the colors instead of doing color blocking, I like that they aren’t so harsh like they would be if I did the hard lines but that you can still totally tell what it is supposed to be. If I did them again I would leave more white at the top so the colors were move even, my pinkie barely has any white left on it. Doing these reminded me of my pride nails and my butterfly nails, I need to do more gradients, they are just pretty.

I look like I have very wrinkly fingers

After my last two fairly low key Halloween designs I’m thinking I need to go out with a bang for my actual Halloween nails. Since Mom’s birthday is on Halloween you may have to wait till November first to see them, but if they turn out anywhere near as cool as they look in my head they will be worth the wait

Tuesday, October 29, 2013

Spider and Web nails


The McRib is back. Since I found out three days ago I have been thinking about that delicious meat-like-substance nonstop. I have a complicated relationship with the McRib, as soon as it comes out every year I essentially drool over the thought of shoving it in my face until I finally break down and actually buy it. After I get to live out the ‘shove it in my face’ fantasy I immediately regret my decision and feel like I’m going to vomit McRib bits everywhere. Even though I know how this adventure will end, I’m desperate to get a McRib and taste the sweet mechanically formed meat. It’s like a question mark wrapped in barbeque sauce.

The McRib has nothing to do with this manicure, but I’m pretty sure a McRib manicure would be awesome. For this manicure I used Sally Hansen CSM Anenome Of Mine, Orly Liquid Vinyl and White Tips, and China Glaze Riveting. Riveting has to be the best Halloween orange ever, it is so sparkly and fun, I almost forgot how much I liked it!
Spider and Web nails

I know I did a similar design last Halloween but I liked it so much I really wanted to do them again. At least this year I got more legs on my spider, still not the correct number, but I’m two legs closer. I decided to put black rhinestones on the webs and really like how it ended up looking, almost like there are little spiders on the web.
Sunlight is this orange’s friend

I really like how these nails turned out, just simple Halloween fun. It’s kind of funny how much I like spider nail art when I hate real spiders, but then again spiders are evil creatures, hell bent on my destruction, so it makes sense that I don’t like them in person.

Monday, October 28, 2013

Jack Skellington nails


I can’t believe it is so far into October and I haven’t posted any Halloween nails yet! I love Halloween nails so it feels like a waste that I haven’t done more this year. I’m hoping to end October with a bang and give you some good Halloween nails, so these will just be the first ones, unless I get lazy. . . . which is always a possibility.

I got the idea for these nails from my very best friend. She sent me a picture of them and I knew I had to try them, I mean it combines Halloween and Disney, how could I not do them? For this manicure I used Orly Liquid Vinyl and White Tips, which just seems like a somewhat fancy way to say that I used black and white.
Jack Skellington nails

These nails were really fun to have but I found that they were distracting to other people in a way my other nails haven’t been before. I interview people at work and while I had these nails I had like six different applicants comment on them during the course of the interview, I’m not sure why these were so much more distracting than my other nails, maybe it was because I had a big skull on my ring finger. I wish I would have been able to make his eye holes smoother on the edges, but other than that I’m actually pretty happy with the overall design.
Are you frightened?

Truth be told, I think I’ve only seen Nightmare Before Christmas once, perhaps I should look to see if it is on Netflix. . . but then again if I try to watch it on Netflix I might get sucked back into the lazy that only Netflix can cause. Hope my first Halloween nails were worth the wait!

Tuesday, October 22, 2013

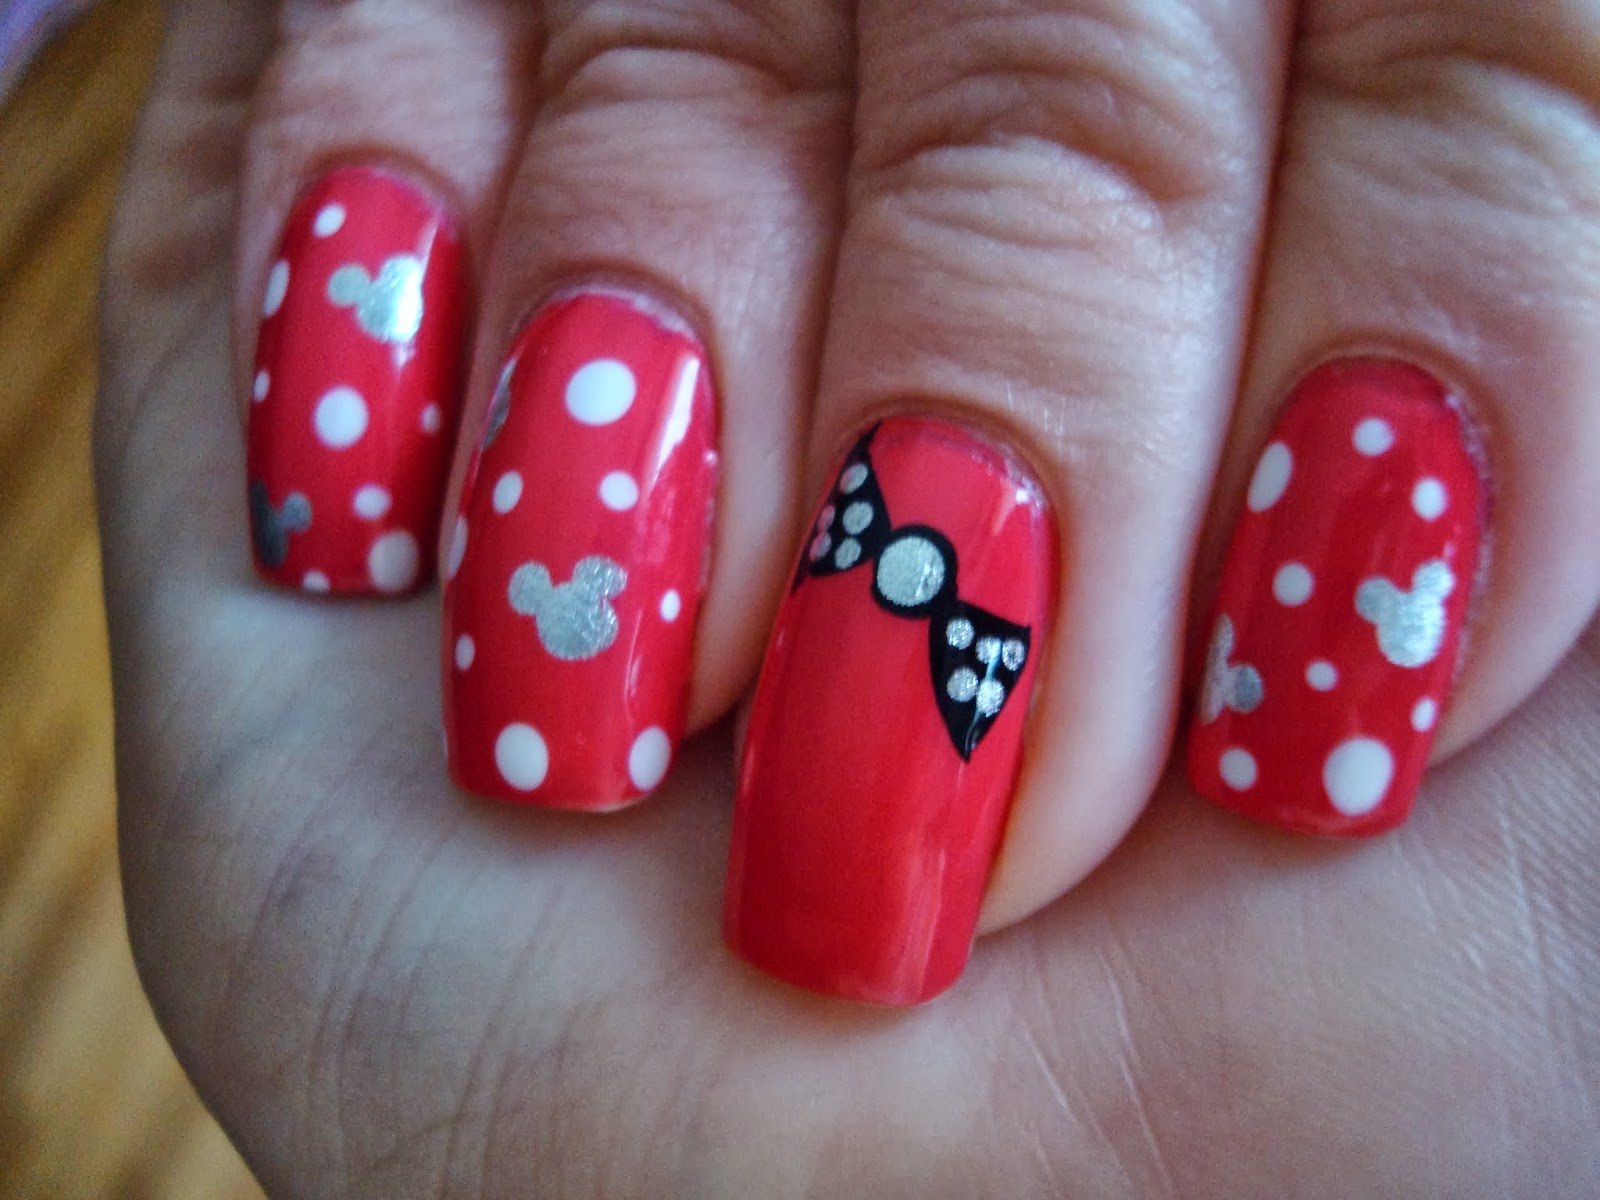
Minnie Mouse nails


My goddaughter just turned one and she had a polka dot themed birthday party. As soon as I got the invite I started thinking of all the possible polka dot nails I could do. I think that dots are my favorite nail design, they were certainly my first. When my niece was first born my brother and his wife told me that I could paint her nails when she was three, so I only have two more years to go. I really hope she likes having her nails painted; I want her to think I’m cool and not some crazy woman hell bent on painting her nails.

After looking at many dot possibilities I decided to do Minnie Mouse nails, that way I could do dots and Disney. I got to say, I love these nails. I love them so much that I’ve decided that this is the design I’m going to put on my toes for Disney. For this manicure I used Sally Hansen CSM Frutti Petutie, OPI DS Radiance, Orly Liquid Vinyl and White Tips.
Minnie Mouse nails

How freakin cute are these nails? That’s a rhetorical question; I know how cute they are. The mouse design is so simple but it looks so cute, I was in love with these nails from the first Minnie head. I’m bummed only two pictures turned out of these nails, I don’t remember being drunk when I took them but based on how blurry they all were I must have been wasted, or a bad photographer, one of those.
Not sure why this one is so dark

If I were to do them again I would make the bow bigger and more rounded on the edges, I’m going to leave the bow out all together when I do this design on my toes but that is mostly because it’s almost impossible to do nail art on any toe that isn’t your big toe and I want as many Minnie heads as possible. This design would make a wonderful first nail  art design for my niece when she turns three, perhaps planning the design now would be a little too early though J

Friday, September 27, 2013

Little Mermaid nails


It is getting to be my favorite nail time of the year but I’m starting to think I may not have enough time to do all the nails that I want to do. Between Halloween, fall, and Disney nails, I have a lot of plans and I’m simply running out of time (68 days till Disney!). Oh, so many plans, so little time. I guess I just need to paint my nails more J

I want to do different nails for all the Disney Princesses, so I figured I should start with my favorite. I have always loved The Little Mermaid; I had a huge poster of it on the back of my bedroom door when I was a little kid. For this manicure I used Orly Prelude to a Kiss, Liquid Vinyl, and White Tips, China Glaze Gothic Lolita, Turned Up Turquoise, and Mahogany Magic, and Sally Hansen CSM All Fired Up and Mermaid’s Tale. I didn’t realize how many colors I used until I just wrote them all out, wow.
Little Mermaid nails

I found some loose glitter pieces that worked perfect as a mermaid tail on my pinky, they were super annoying to have on though, my hair got all caught up in it while I was washing my hair, not a pleasant experience. I wasn’t really sure what I wanted to do for all my nails and after I did the shell bra it occurred to me that it was a little weird that I focused on Ariel’s chest, I’m sure she will forgive me.
I’m not even sure how I bent my thumb like that

My favorite nail is the Ariel on my thumb, I think she turned out really cute and it makes me want to do a nail like that for all the princesses. I’m going to have to come up with other things to add to them to make them all look different; otherwise all the blondes will look pretty similar.

Not only is today 68 days till Disney, it’s also my 5th anniversary. I’m super lucky to be married to Thad, he is an awesome husband, and I’m pretty sure I could be married to him forever J Happy anniversary honey!

Monday, September 23, 2013

Tuxedo nail step by step


Netflix is evil. They recently changed how they play TV shows so that the next one starts 20 seconds after the last one ended. I have watched a shameful amount of How I Met Your Mother over the last few weeks but there are so many freakin episodes that I’m pretty sure I’m going to be watching this show for the next few months. Oh how TV helps me to be so lazy.

I had a first today! I was asked to do a step by step for my tuxedo nails that I did in June (as part of my wedding nails). I’ve never done a step by step before, but I hope this helps you to recreate my tuxedo nails. For this manicure I used Orly White Tips and Liquid Vinyl, Sally Hansen CSM Wine Not, and China Glaze Rich & Famous. A few disclaimers about my step by step: 1. I didn’t actually want to have tuxedo nails so I only painted two nails 2. I’m a really messy painter so please disregard all the paint that appears to not be on my nails and 3. I don’t actually have a third disclaimer, but it felt like I couldn’t just have two.
I start these nails like I start all nails, with a coat of OPI Nail Envy and SV base coat. On top of that I did two coats of Orly.
To start my tuxedos I painted a V with a black striper and then filled in the bottom of my nail with the Orly brush. To get in the ‘tight’ places I used a dotting tool. Try to get the V as centered on your nail as possible; I didn’t do so well on that front.
Ok, it looks like I did a lot in this step, but I really didn’t. To create the bow tie I did one smallish center dot and then used a dotting tool to create two small triangles off of it. I then put buttons on my tux and the dots on my black nail (I think they sorta look like buttons too). I put one larger white dot on the black tux so I could create the boutonniere.
To make the boutonniere I put a pink dot on top of the white dot and then took my wine color and made small c shapes in the pink with it. It’s ok when you are doing this if the pink swirls with the other color a little, it just makes it look more like a rose.

That’s how I did these nails! If you don’t have a striper you can use any small brush dipped in polish. If you don’t have a dotting tool that’s ok too, you can use the pointed end of a toothpick for the small stuff (like the detail on the flower) or cut the toothpick in half and file it smooth to use for a larger dot (like for the bow tie or buttons). For even larger dots you can use the end of a quilting pin, although you may want to put the pointy end in an eraser or something so you don’t injure yourself.

Hope this step by step was helpful, if you do these nails I would love to know how they turned out, be sure to let me know in the comments J

Monday, September 9, 2013

Grumpy Cat nails


I’m sorry for the long wait to see my birthday nails, but I hope they are worth the wait J. I was thinking for a long time about what nails I wanted to do to commemorate my 30th birthday and it wasn’t until a few days before the big day that I finally settled on the design. My fellow nail lover friend Patty is the one who suggested I do Grumpy Cat nails, and I can’t think of better nails to have when turning 30.

I surprised myself with how little flash these nails had but I ended up liking the solid brown next to the designed nails. For this manicure I used Sally Hansen CSM Barracuda, OPI Brisbane Bronze, Aphrodite’s Pink Nightie, and Pompeii Purple, and Orly Liquid Vinyl and White Tips.
Grumpy Cat nails

To create the adorable yet grumpy kitty on my middle finger I used a corner piece of makeup sponge and sponged on the white first. The triangular shape of the sponge helped define her ears. I did two layers of the white before I sponged on the brown; I always forget how much I love this brown!
Nothing says turning 30 like a disgruntled kitty on your middle finger

To get her tiny angry mouth I used my smallest dotting tool and used a stippling method to tap the color on. My original idea was to put a party hat on her but she took so long to do that I didn’t want to risk messing her up. To make it a little more birthday themed I put balloons on my thumb and pinkie. My right hand has balloons on the pinkie, middle, and thumb.
 
I can’t believe I missed her at the state fair

I had this manicure when I went to get a facial after my birthday and I got asked one of my favorite nail questions by the salon lady. She asked if I paint them before I put them on, I’m sure a loser that I love being able to say ‘no, actually they are real’. I hope my birthday nails were worth the wait and that you love Grumpy Cat as much as I do J

Wednesday, August 28, 2013

Interview nails


I generally don’t talk too much about my job, but this time it relates to my nails so I’m going to go for it. I really like my job, that isn’t something I thought I would be able to say a year ago. I’ve been filling in at work as an administrative assistant and I found that being an admin is something I truly enjoy, and not just because we have a whole day dedicated to us. There is something about the controlled chaos of being an admin that makes me happy to go to work, believe it or not, Monday is my favorite day of the work week, how freakin ridiculous is that?

I mention my job because in the last couple of weeks I was able to apply and interview to make my job a permanent position, of course, as soon as the job posted I started thinking about interview nails. This blog has two different designs because I had two different interviews. For the first manicure I used Orly White Tips. They are perhaps the most boring (read professional) nails I’ve ever done.
Interview nails

I was really nervous about my first interview and wanted to make sure my nails were really professional and not too flashy. These turned out just how I wanted, in person the line was a nice dark gray and I wore a dark gray skirt so they coordinated well. For my second set of interview nails I used Orly Liquid Vinyl and White Tips and China Glaze Rich & Famous. These nails are a bit bolder J
These nails say ‘hire me’

After the first interview I realized my nails didn’t really show at all, so I decided to have super fun nails that matched my outfit and made me feel fancy. This is only the second time I’ve tried a half moon manicure and I love how they turned out. To cover up the rough edge between the two base colors I put in the dots and I must say I really like how that turned out.
I guess they could have been more professional

I really liked both of my interview manicures; they gave me that little extra confidence that I needed going into the interviews. The best part about the manicures is that they were part of successful interviews; there really isn’t anything more I could have asked from them J

Saturday, August 3, 2013

Lace nails


My month of social weekends has begun. Last weekend I went to a co-worker’s bridal shower at the arboretum. My mom has always wanted to go to there and the bride-to-be was nice enough to let her come along, so on a very unseasonably cold Saturday, my mom and I made our way to the arboretum. It was probably them most fun I have ever had at a bridal shower (not including mine of course). As part of the shower we got to go on a tram ride, it was so much fun to learn all about all the flowers and trees and everything was so pretty. Without a doubt it was the most educational shower I’ve ever been to J I do also feel it necessary to point out that I kicked ass at one of the shower games and won a cute butterfly coffee mug, I don’t think anyone knew how competitive I was until that game started.

I wanted to have nails for the wedding shower that fit with the bride’s wedding theme. She told me one of her colors was wine and her theme is burlap and lace, since burlap didn’t really intrigue me, I decided to try the lace. For this manicure I used Sally Hansen CSM Wine Not and Orly White Tips. I love how shiny these nails turned out, they are some of the classier nails that I’ve done recently.
Lace nails

My pictures for these nails didn’t turn out very well. They were kind of old by the time I took pictures of them and the tip wear is very evident, I think I also had trouble because the nails were so shiny that they reflected a lot of light and it makes them almost look spotty. These are definitely nails that I preferred in person. I didn’t wait long enough to do my top coat and smeared the white on the lace a little bit, but aside for that the lace turned out how I wanted it to.
Not my best photography

I want to try lace nails that actually have real lace on them next. Maybe I can do that for her wedding, although by then I should really figure out how to do something that looks like burlap. These nails were nice for the shower because they weren’t too flashy; I didn’t end up keeping them for very long though. I guess I just like gaudy nails more J

Sunday, July 28, 2013

Doodle nails


I’m not a very social person, as evident by the fact that I’m in my PJs writing this blog on a Friday night. Despite my non social nature, I have somehow managed to make plan for every weekend between now and labor day. This is unchartered territory for me; generally my weekends are filled with Netflix, not people. Truth be told some of my plans are more exciting than others; I can’t believe I get to go to Vegas in two weeks! All these plans mean that I have a lot of nail designs to plan out J

I love these nails the longer they are on my hands. They are so cute and fun! For this manicure I used Orly Liquid Vinyl, Lemonade, and White Tips, Sally Hansen CSM Barracuda, and China Glaze Rich & Famous. I have used Barracuda so much since I got it; I think it is officially one of my favorite summer colors.
Doodle nails

It took me a few tries before I got the black lines the right thickness, that is why the yellow flower on my ring finger is a bit wonky. I ended up using the smallest dotting tool I had, I think the end of a toothpick would work well too if you didn’t have dotting tools.
They are just so much fun!

Sponging these made me remember how much I love the look of sponged nails; I really need to come up with more ideas so I get to sponge more. I’ll have to get on the interwebs and do some searching J Even though these nails are really colorful, I feel like they aren’t as gaudy as some of the other designs I’ve done.
I love them so much you get three pictures

I broke a thumb nail a couple of days after I painted these and ended up having to cut all my nails. As much as I liked this design on my long nails, I think I liked it even better on my little stumpy nails, so I guess there is a silver lining to the break.

Thursday, July 18, 2013

Wizard of Oz nails


I don’t have a fun way to start this blog so I’m just going to talk about my nails. I have a post it that I keep a list of nail ideas on and chose this one off the list to do. Without thinking about it I ended up doing two movie themed nails in a row, perhaps I can think of more and do a whole series of them. I feel like I should mention that I don’t actually like the movie Wizard of Oz, the monkeys scared me as a kid (that’s a lie the monkeys still scare the shit out of me). Despite the terrifying monkeys I thought the movie would make for a good muse for my nails and I was right.

These nails are distractingly gaudy, they may even be ugly. For this manicure I used quite a few colors, Orly Skinny Dip, Liquid Vinyl, and White Tips, Sally Hansen CSM All Fired UP, Gilty Pleasure, and Butterscotch, China Glaze Ruby Pumps and Paper Chasing, and OPI DS Radiance.
Wizard of Oz nails

My pinkie is supposed to be the Emerald City but I think it looks more like a pineapple, I guess this means if I ever do Spongebob nails I know how to make his pineapple under the sea. The red nail is supposed to be for Dorothy’s ruby red slippers, I was so happy when I found the red for it and then saw the name was Ruby Pumps so I’m pretty sure that was meant to be.
I’m not sure where the tiny divots on my Tin Man came from

My other nails are for the Tin Man, Dorothy’s dress, and the yellow brick road. I bought Butterscotch for Winnie the Pooh nails, but I thought it made for a good road.I was really happy with how the Tin Man nails turned out, since he was my favorite I had to include something for him.
I liked three pictures, so you get three pictures of these

These nails are fun but not very flattering; they are a bit too bold even for me. I think if I were going to do them again I would choose just two designs and not five different ones (I’d keep the pineapple of course). Now let’s see if I can come up with another movie theme, perhaps one that doesn’t distract me so much J


Tuesday, July 16, 2013

Disney's Up nails


It isn’t very often that my family all gets together. We had the opportunity to all get together this weekend though to celebrate my parents’ 35th anniversary and had a blast. In good Minnesota fashion there was way too much food, including an entire table of desserts. I parked myself right next to that table of deliciousness with my beer in hand and had myself a grand time. I have seven nieces and nephews on that side of the family; they are almost their own baseball team, although I’m not sure how well a 3 month old would be able to handle a baseball. It’s awesome to see all my brothers as dads, growing up they had the unspoken rule that they could tease me all they wanted but no one else better try it, and it is just cool to see them protecting their kids now.

I thought it would be cool to do nails for a love story since these were the nails I had at the anniversary party. I love the movie Up, it has such a cute love story (and yes it always makes me cry). For this manicure I used a crap ton of colors, Orly Lemonade, Mayhem Mentality, White Tips, and Skinny Dip, OPI You’re Such a Budapest, China Glaze Turned Up Turquoise, Mahogany Magic, and Pool Party, and Sally Hansen CSM Barracuda.
Disney's Up nails

I was very pleased with how these nails turned out. I wish I would have made the balloon strings a little darker, but besides that I’m very happy. These are the first nails I’ve ever done that I modified the design for my right hand, I just put clouds on my right thumb since the house was so hard to do in the first place.
The house is far from perfect but still pretty cute

I was really bummed when people didn’t immediately recognize what the design was supposed to be, but it was pretty cool when someone did. The nails were a big hit at the party and I got a lot of “you do that yourself?!?!” which I love. Overall I would say these were a success J

Tuesday, July 2, 2013

Tuxedo Wedding nails


I know I’ve mentioned it before, but whipped vodka is delicious. My brilliant friend Jackie introduced this delicious beverage to me last year and I’ve taken care of my fair share of bottle of it since then. Recently Jackie came through with another dazzling idea and suggested I mix my whipped vodka with cranberry juice. It tastes just like cheesecake! I don’t know how the combination of cranberries and whipped cream make cheesecake but it does and it is amazing. This might be my new favorite drink and I have Jackie to thank for it, thank you Jackie!!!

I wanted to end my wedding themed nails with a fun design and I think I accomplished that goal. For this manicure I used Orly White Tips and Liquid Vinyl, and Sally Hansen CSM All Fired Up and Wine Not. I think these nails would be perfect if you were the best lady in a wedding (as in a lady best man). They are super cute aren’t they?
Tuxedo Wedding nails

When I was starting these nails Jackie suggested that I do boutonnieres and I’m very happy she suggested that because they really set off the overall look. Not surprisingly, the tuxedos took quite a while to do so I’m happy I decided to only do them as accent nails. The other nails also make the overall look a little classier than they would be with all little tuxes.
And of course there is a dog hair, sigh

These nails are just fun, they are not technically the best nails I have done (I made a lot of mistakes) but they are some of the most fun. I had these nails on when I went to Ulta today and I had two different sales ladies grab my hand to look at them closer. One of the ladies actually recognized me when I came in and asked to see my nails right away because she knew ‘they would be cool’. I’m starting to feel like a celebrity there J

Friday, June 28, 2013

Something Blue Wedding nails


I may have just done something dangerous; I put my jeans in the dryer. I’ve put other pairs of jeans in the dryer before, but this is the first time I’ve put this pair in, they are my ‘skinny’ jeans. I hate saying they are ‘skinny’ though as they are not skinny cut jeans and any pair of pants that has a hope of fitting me are clearly not skinny, but what I mean to say is they are my smaller fitting jeans. . . and I put them in the dryer. It was a bold move, I hope I don’t come to regret my impulsive last minute dryer decision, I suppose only time will tell. If you are super confused right now, drying jeans makes them smaller, you now have all the information you need to put all of that in context, you are welcome.

I wanted to do more wedding themed nails but I also wanted to do nails for the Bride that isn’t into pink. For this manicure I used China Glaze For Audrey and Orly White Tips. My original idea was for my nails to look like boxes from Tiffany’s and although I’ve never actually seen one of their boxes, I think they turned out pretty cute.
Something Blue nails

I ended up making the bows too big for the nails to really be considered classy but they are cute anyway. I think these nails would be perfect for a really low key wedding. I really need to start doing a better job of cleaning up the edges of my nails while they are still wet; the ridges on the sides are super annoying in these pictures. I’m going to need to finally invest in orange sticks, oh darn I have to go to Sally’s.
The edges are super annoying, right?

I broke my nail file this morning, it’s one of those awesome crystal nail files and it slipped right out of my hands and broke on the hardwood floor. I really liked that file and my nails need to be shortened so the timing wasn’t awesome, I guess I have more than one reason to go to Sally’s now, double darn for that. Hope you liked these wedding nails J

Wednesday, June 26, 2013

Classic Wedding nails


I can’t believe June is almost over, everyone is seriously running out of shopping days until my birthday. Don’t worry though, you do still have plenty of time to pick out the perfect birthday gift for me J. It has been miserably hot and stormy recently, I used to love thunderstorms but Millie is so scared of them that they are no longer fun. Fireworks are also no longer fun. I’m thinking about buying one of those thunder shirts that they sell in the pet store, I’m sure wrestling her into it would be less than fun, but it if kept her from waking us up that would be awesome and totally worth the glory rolling basset hound.

I went to a wedding this weekend and wanted very traditional wedding nails for the big day. For this manicure I used OPI Rosy Future and Orly White Tips. I was really pleased with how the design turned out (I used a couple of my many stripers) and I got the excuse to use my rhinestones again which always makes me happy.
Classic French Wedding nails

These nails are super simple but overall I’m very pleased with how they turned out. I painted them Thursday night and didn’t take pictures of them until Sunday though so they have a little road wear. There is something about drinking that really messes my nails up; I’m going to guess it is the general loss of motor control.
French Tips always make my nails look so long

These nails were perfect for the wedding; I wore purple so they coordinated without being too matchy. I also didn’t want them to be too flashy (they couldn’t be fancier than the Bride’s nails after all). I’m having fun with these bridal nails but I haven’t decided how many I’m going to do yet. . . I’m going to keep you at the edge of your seat I guess J

Wednesday, June 5, 2013

Striped nails


I’ve never been a huge fan of baseball. When I was a kid all my brothers were in little league and I remember being super bored at the games. My dad loved baseball so he would have us all go out to the ballpark on weekends and play as a team. Dad always gave me special rules so that I wouldn’t suck too bad, for instance I got five strikes and if after that I still didn’t hit the ball, he would throw the ball as if I had hit it and let me run to base. Thinking back, I’m pretty sure that I never hit the ball. What can I say? Sports aren’t in my blood, but nails are J

I did these nails for a Twins game this weekend. I didn’t want them to be too basebally (since as previously stated I’m not a huge fan) but I did still want them to be somewhat Twins themed. I found this idea online (cutepolish is amazing) and just had to do it right away. For this manicure I used OPI DS Radiance, China Glaze Splish Splash, Sally Hansen CSM All Fired Up, and Orly White Tips. I’ve talked before about how much I hate white polish so I got this Orly to replace my OPI and it is so much better. I think it is most noticeable when you look at the coverage around my cuticles.
Striped nails

These nails were easy but required a lot of work. To do the stripes I used those dental flossers that you get from the drugstore. In order for the paint to stick to them you have to make sure to get the kind that are not ‘glide’, I of course only had that kind so I walked to Wallgreens, they were out, so I walked to CSV and there I found the flossers I needed. At this point I had already put in a lot of work and I hadn’t even started painting my nails!
I always seem to have dog hairs in my pictures

These nails made a much bigger mess than I thought they would, paint got on the plastic edges of the flosser so the paint then got all over the sides of my fingers. They also took a really long time, new paint had to be put on for each stripe and I did each color twice. I didn’t mind how long they took though because I was watching Wreck-it-Ralph and it was a really cute movie.
This makes them look more basebally

I really liked how these turned out and they make me want to do them in different colors, like all different shades of blue would be cool. Hope you liked them too J